September 2, 2010

Adobe ilustrator Tutorial : Creating 3D Book Icon


This tutorial shows you how to create 3D book icon from scratch using Adobe Illustrator. This useful illustrator tutorial you can use as a reference guide for making another 3D icon. This step by step tutorial is easy to follow for the beginner.


With pictures and detail explanations, this tutorial guide you with easy and clean explanation of tutorial. Word from author "Open a new document, I'm working with a 800x600 px workspace, and CMYK colors. Draw a shape with your Pen tool (P), as you see in the image. If you're not familiar using the Pen tool, than you can try to create a rounded rectangle with the Rounded Rectangle tool, and with the help of a rectangle you can cut out a shape that you need (Window > Pathfinder > Alt + Subtract). Add a point to the right side of the shape, and delete it. So you have the shape. As you can see, it's more easier to draw with the Pen tool. The final shape has a 115px width, and 26px height.

Follow illustrator tutorial Creating 3D Book Icon

Continue to read...

September 15, 2009

Illustrator Tutorial : Japanese Style Tattoos

illustrator tutorial, making tattoos with illustrator, adobe tutorials, illustrator tutorialsWord from author : "In the first part illustrator tutorials of this three-part series I’ll be showing you step-by-step how to create beautiful outline art, but be sure to check out the next issue so that you can learn how to add colour, work with symbols and master the art of working with clipping masks." In part one of his new Adobe Illustrator tutorial masterclass on digital skin art, Derek Leareveals the benefits of using template layers and explains the intricacies of creating and working with custom brush strokes.

Illustrator’s brushes are the ideal tool for such a task; they provide flexibility, control, and lend themselves well to a non- linear workflow. When tracing your initial
sketch, a template layer will give you the opportunity to keep your sketch visible in
Outline or Preview mode. This way you can toggle between modes as you work, and have a constant visible guide.
Download free tutorial "Illustrator Tutorial : Japanese Style Tattoos" here!

Continue to read...

September 8, 2009

AutoCAD Tutorial : Create Basic 3D Objects

This tutorial outlines the procedures for creating three-dimensional objects by creating basic 3D shapes known as solid primitives. You can also create 3D models by extruding 2D shapes. Audience: Users new to 3D modeling with AutoCAD 2010. Prerequisites: Working knowledge of 2D drafting. Time to complete: 15 minutes.
Objectives of this AutoCAD Tutorial : Create Basic 3D Objects : Create 3D solid primitives and Create 3D objects from 2D objects.

In this lesson, you learn how to create 3D solid primitives in the 3D Modeling workspace.
You can use standard 3D solid objects known as solid primitives to create a box, cone, cylinder, sphere, torus, wedge, and pyramid. To create these 3D solid primitives, switch the workspace to 3D Modeling, where the palettes and ribbon panel are customized to create and modify 3D solid models.

Download free tutorial "AutoCAD Tutorial : Create Basic 3D Objects" here!

Continue to read...

September 7, 2009

AutoCAD 3D Tutorial

autocad tutorials, autocad 3d tutorial, 3d tutorial, autocad tutorialThe AutoCAD workspaces are sets of menus, toolbars and dockable windows (such as the Properties palette, DesignCenter, and the Tool palettes window) that are grouped and organized so that you can work in a custom, task-oriented drawing environment. AutoCAD’s 3D Interface consists of three main areas : Panels, Anchored palettes and A 3D workspace


The dashboard consists of a set of control panels organized by function. For example, the top control panel contains commands that create and modify 3D solids; the second control panel contains commands and controls used to navigate 3D models.

Download free tutorial "AutoCAD 3D Tutorial" here!

Continue to read...

Maya Tutorial : Modeling a Perfect 3D Face

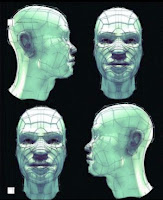
maya modeling tutorial, modeling 3d head tutorial, maya tutorial, 3d modeling tutorials, 3d modeling tutorialHere are many ways in which to model a head in 3D. In this maya 3d modeling tutorial, we'll look at polygon modelling with subdivision smoothing for mesh refinement. This approach enables you to create the topology of the face mesh in a very direct and hands-on manner. With NURBS modelling, creating a human head can be problematic, and the best method involves stitching multiple surfaces together. This takes an awful lot of planning and isn’t a method you can jump straight into. Polygon modelling enables you to correct mistakes more fast and easily.

Correct topology (the way a surface is structured) is the single most important aspect of head modelling. We'll be creating special topological structures, known as ‘edge loops', which outline areas of the face and mimic the rings of muscle under the skin. Without proper loops, a head will be difficult to animate. We’ll also be making sure all the polygons have four vertices (called quads). A mesh of all quads is less likely to pinch when smoothed and animated. Although this tutorial uses Maya, the principles employed are applicable whatever app you use.

Download free tutorial "Maya Tutorial : Modeling a Perfect 3D Face" here!

Continue to read...